
ART & PLEIN AIR
My Plein Air Setup

Todd Saal, Nashville, TN
June 19, 2017
I’ve been getting a lot of questions recently about my painting setup as I’ve posting more while working outdoors. I figured I’d show my previous and current setups. But more important, why I switched.
I’ll start off saying that both setups aren’t anything that other folks aren’t already using. I’m not reinventing the wheel here. I built most of the pieces for both but I could’ve easily purchased a setup. There’s a lot of great products making it easy for us to get out of the confines of our homes/studios and paint outdoors. I put together my previous setup from scraps of wood and things I already had on hand. My current setup was more thought out and put together with a very specific goal in mind. To have everything contained in one place in order to stop worrying about the gear. Just get out and paint. Everywhere, all the time.
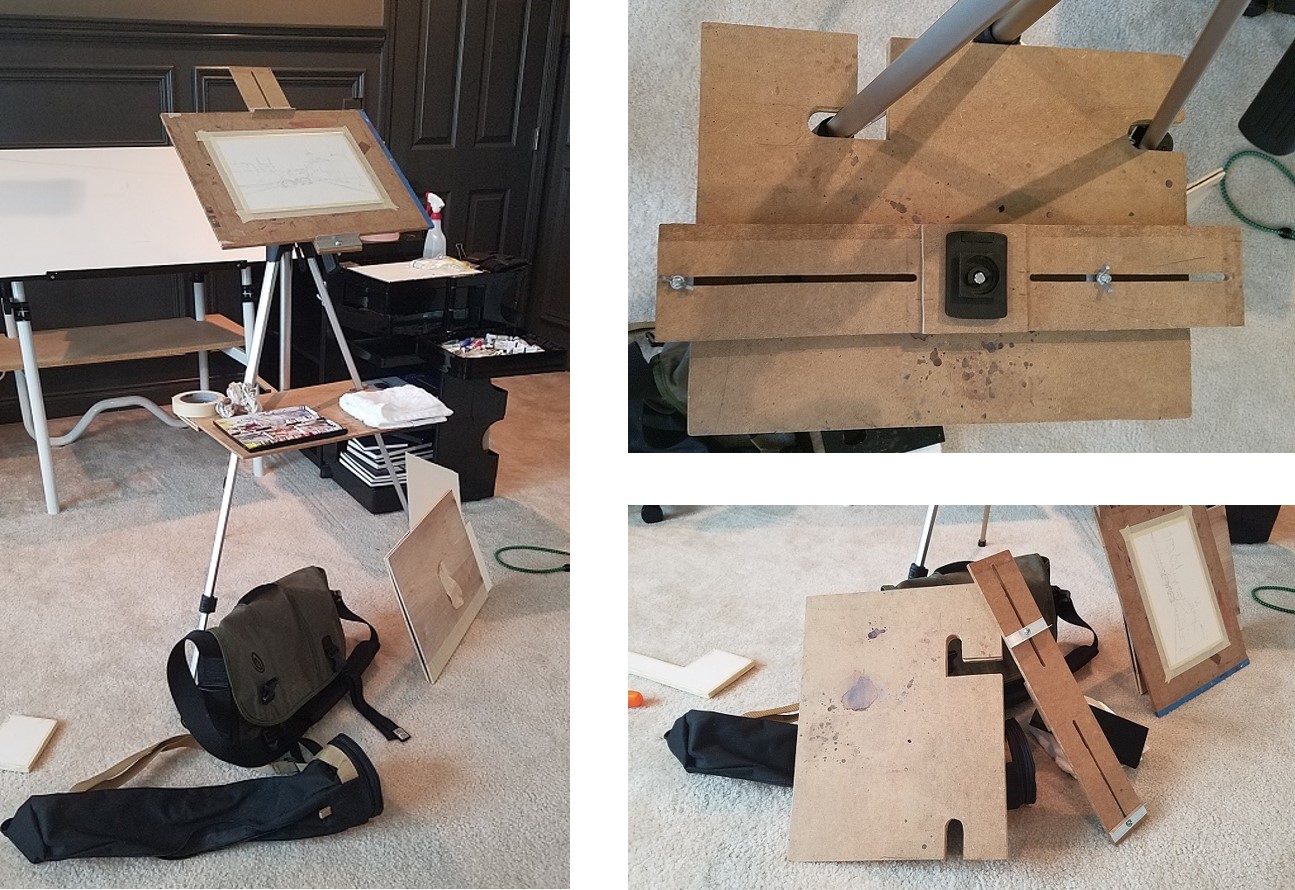
Previous tripod setup
My previous setup shown in the pictures above was similar to any of the various tripod/telescoping crossbar pairing types of easels. Paper would be taped to a board. The board would then be placed between 2 clamps on the bar to hold it place. The board could be adjusted to any angle from the tripod head. It was light and portable. I carried a backpack for the various other items such as my palette, sketchbook, tape, brushes, etc. I also carried various boards clamped together. One acted as a shelf that I attached to the tripod where I’d put my water container and palette while I painted. Another was the board that I taped my paper to paint on. Another 2 boards were taped on one end that held loose sheets of paper. I would throw it all in my car and off I’d go to find a spot to paint. It worked great. Hell it still does.
“So then the excuses started. I don’t feel like carrying all this stuff everywhere. I really wanted something that would minimize the amount of crap I needed to carry.”
There’s a lot of the one lane roads with no shoulders where I live in Nashville. It’s hard to just pull over to the side of the road and paint. I’d park and then walk quite a distance to the spot where I wanted to set up. I love to walk so that wasn’t the issue. It became awkward to carry the numerous pieces and keep them contained in this situation. So then the excuses started. I don’t feel like carrying all this stuff everywhere. I really wanted something that would minimize the amount of crap I needed to carry. I attended a plein air workshop with Dan Marshall recently. He had a briefcase paintbox setup just like Joseph Zbukvic who happens to be Dan’s mentor. Both artists are just ridiculously talented. The top of the box has a hinged lid that can be adjusted to an angle to put you board and paper on. Inside the lid is a compartment to hold loose sheets of paper. A palette and a brush box fit in the main part of the case under the top lid. The brush box lid would slide forward and act as a shelf for your palette while painting. The bottom of this setup has tripod legs so you could set it up like table. I asked Dan how his setup differed from Joseph’s. The main difference is that it’s smaller so he could fit in the overheads on planes. I was also following the work and conversing with Paul Michel, another fabulous watercolor painter from Lausanne, Switzerland. He too built his own version of this setup. The main thing with each of these setups is they’re tailored to how they want to work. Done! I needed this. So I decided to remove the excuses and breakdown and build another setup.

My current plein air paintbox
I wrote down everything I wanted the new setup to resolve. I wanted to be able to store and paint up to ¼ sheets with everything contained in this main unit and a small backpack for the miscellaneous items. I also travel through the dreaded Atlanta airport. I’ve had to run through this airport more than once, barely making my connecting flight. So not only did this setup need to fit in the planes overhead but under the seat as well. I finished it 2 days before my trip to NYC. No better way to test it than take it on the road. It fit under the seat with a small messenger bag on top – fantastic. I dragged this around with me everywhere around Manhattan for a week. I made a few minor modifications when I got back. It’s now with me everywhere I go here in Nashville.
This new setup continues to support my urge to streamline. It’s not only more convenient than my previous one but it’s also a comparable to what I use at home in my studio. Similar layout, same brushes, paper, etc. Everything is the same. Except the fresh air and human interaction of course. Until recently my painting was done about 80% indoors and 20% outdoors. Now that things are more simplified I’d say it’s the reverse. It’s great to get out. It’s weird, you really see things differently painting outdoors than just from photos. There’s also the experiences that occur. Does this new setup by itself make me a better painter? Absolutely not! What it does do is give me the ability to paint wherever and whenever I want. I no longer care about the setup. I care about being able to set up quickly and paint where and when I want so I can get better.
Ultimately I’m trying to get into and stay in that creative state. What do you use to get in that creative state outdoors quickly? Till next time…
6 Comments
Leave a Reply to Todd Saal Cancel reply
Todd Saal
Todd Saal is an American artist and musician currently residing in Nashville TN.
Copyright and Reproduction. The Artist reserves all reproduction rights, including the right to claim statutory copyright in the Work. The Work may not be photographed, sketched, painted, or reproduced in any manner whatsoever without the express written consent of the Artist.
© 2024 Todd Saal. All rights reserved.
FOLLOW TODD
Hey Todd,
I sound just like you. My name is Geoff Allen and i built my own as well but it is slightly too big and i am preparing to build another one. My question for you is where did you find the side sliders? I couldn’t find a supplier in the states. I ended up telescoping aluminum tubing and tapping a knob to make it stay in place. Very nice job on you box. In my design I changed the bottom lid (two lines instead of one big one) and made the legs attach to the lids. That made it way more stable.
Thanks you, Geoff Allen
Thanks Geoff. I do get a lot of questions on my setup. As of late I’ve been sending people over to check out Dan Marshall’s setup. He’s a fantastic artist and has started selling his own brand based on the design a lot of us have copied. If you haven’t seen it it’s absolutely worth a look. Here’s the link Dan Marshall Painting Box.
Your setup sounds like you made some nice improvements. I fabricated the sliders from aluminum stock. The out part is from some “C” channel aluminum and inner part is just some flat stock. Works like a charm
That’s a great setup for plein-air. Nice work !
Do you find this stable in wind ?
I am planning to build something similar myself. Do you have any tips or blue prints/guide that could help me ?
Thanks a lot!
Finally getting passed a crazy schedule. I found some photos from when I was building the box. I’ll send them over along with some info in the next day or 2
Hi Todd great setup where did you get the legs from and would you mind sharing any specs on the build as i am keen to construct.
Water colour Plein air painting is a passion of mine and would appreciate your help.
Jon
Perth
West Australia
Hey Jon,
My sincerest appologies about not writing back. My schedule have been so crazy that my website has been left a bit unattended. I’m back and will be writing again too. I’ve changed my setup since my last post on it. I’ve basically cut the box in half, removed the legs, installed a plate and tripod adapter to the bottom of the box. I carry a tripod separately in my backpack. I actually like the new setup better. I distributes the weight more and has cut the weight of the box down more than half. I modeled the box itself from looking at pictures of Joseph Zbukvic’s box. I took a workshop with Dan Marshall a couple of years ago. He studied with Joesph. He’s good friends with him now. Dan created a similar box as well. Dan made a changes to the design that I’ve since incorporated into mine. Dan has started selling them. I’ve been with Dan and have seen the product. He’s thought, tested and uses it daily. Good stuff. Head over to his site and see if it fits your needs. Dan Marshall Field Box
Todd